

Creating a video tour of an image
One of the most awesome things about the Movidmo video editor is its ability to turn static images into video content. Movidmo allows images to be displayed in moving form meaning that the portion of the image that is displayed, which is called the image viewport, can change over time. The viewport for an image can zoom in or out around a specific point, and the viewport can be adjusted to pan across an image from one point to another. This general approach is sometimes referred to as the Ken Burn's effect because the director often uses these techniques in his documentaries. This blog covers how to use the Movidmo video editor to create a video with that cool Ken Burn's vibe by panning across a static background image in a variety of directions.
Before starting, it is worth pointing out that the moving image viewport is available for images used in both the backdrop and content layers. If you are unfamiliar with the differences between these two layers, check out the Movidmo documentation. The moving viewport can be used by choosing an animation when adding images to the content layer with standard zoom (in/out) and pan (up/down/left/right) options available. More control over the image viewport is available for images in the backdrop. When adding an image to the backdrop, both a starting viewport and an ending viewport can be specified. The duration (in seconds) of the interpolated movement between the two viewports can also be specified along with the time to display the ending viewport in static (still) form. The example below will make use of the expanded viewport capabilities available in the backdrop.
To get started, open the Movidmo editor and select the Wide (16x9) size format. Then open the backdrop editor and delete the default gray background video. Next, let's find an image to use in the backdrop. The Unsplash image repository is one of the searchable media libraries that is available in the Movidmo editor. This ever growing repository contains millions of great images that can be easily included in a Movidmo project. Searching this library for the term "map" led to the image below which will be used for the remainder of this example. The image is a nicely designed travel photo that is 1600 pixels wide and 1200 pixels tall.

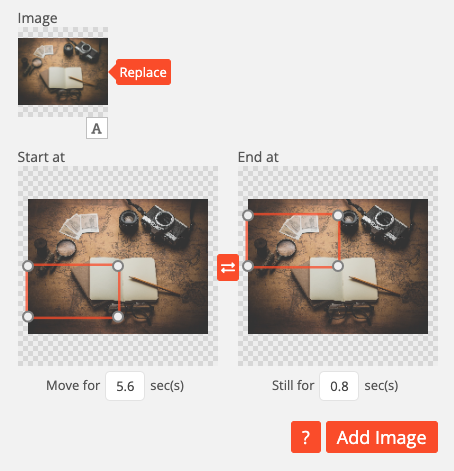
When the image is selected from the Unsplash search results, the location and size of the starting and ending viewports can be adjusted by moving and resizing the red rectangle that sits on top of the image in each case. The aspect ratio of the viewport rectangles are locked to match the 16x9 size format selected for the project. By default, these rectangles are set to zoom into the image over the course of four seconds as shown below. The default interface for adding the image to the backdrop is shown below.

To have more control over the viewport specifications, double-click on the starting image or ending image to position and size the associated viewport using a larger display as shown below. This display also contains inputs for explicitly specifying the viewport region numerically. The position of the viewport is defined by its horizontal distance from the left of the image (in pixels) and its vertical distance from the top of the image (in pixels). The size of the viewport is defined by a width and height both also measured in pixels.

The goal of this example is to render a video that pans across the image in the manner shown below. The viewport used will be 800 pixels wide with a height of 450 pixels. The viewport will move sequentially from position 1 to position 4 and then back to position 1. Starting from the left edge and 150 pixels from the top of the image, the viewport will move to the right. When it reaches the right edge, the viewport will move down until its bottom edge is 150 pixels from the bottom of the image. The viewport will then move back left until it reaches the left edge of the image. After which, the viewport will move up to its original starting position.

To accomplish this goal, the same image will be added to the backdrop four separate times, once for each movement. The two horizontal movements (1 to 2 and 3 to 4) will cover 800 pixels in 10 seconds. That's a speed of 80 pixels per second. To match this speed, the two vertical movements (2 to 3 and 4 to 1) will cover 450 pixels in 450/80 = 5.6 seconds.
After selecting the image for the backdrop the first time, use the double-click method to set the starting and ending viewports to match the movement from 1 to 2 as shown below. For the starting viewport, set the left distance to 0 pixels, the top distance to 150 pixels and the width to 800 pixels. Once the width is set the height input will automatically adjust to 450 pixels to match the aspect ratio. Use the same size for the starting and ending viewports for all images added to the backdrop below. In a similar fashion, set the ending viewport to be 800 pixels from the left and 150 pixels from the top.
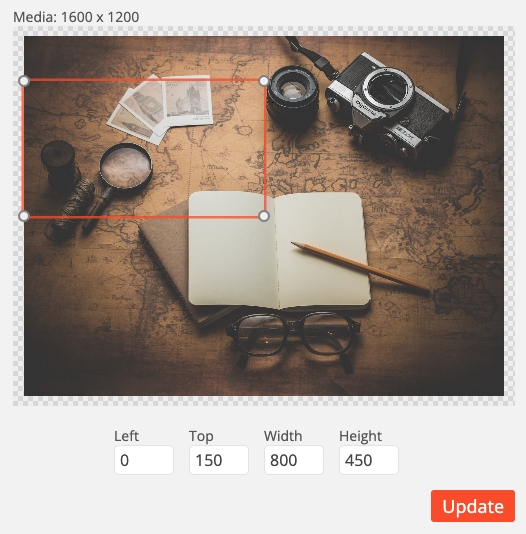
Click Update after editing each viewport to return to the original interface shown below. Set the movement time to 10 seconds, the still time to 0 seconds and then click Add Image.

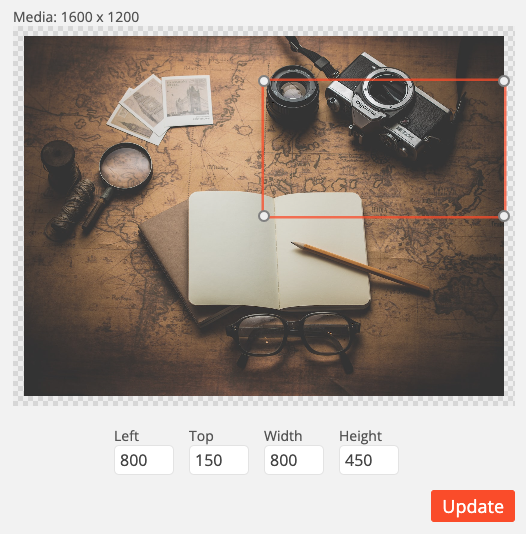
Next add the same image to the backdrop a second time as shown below. Use the double-click method to set the starting and ending viewports to match the movement from 2 to 3. For the starting viewport, set the left distance to 800 pixels, and the top distance to 150 pixels. Set the ending viewport to be 800 pixels from the left and 600 pixels from the top.


Click Update after editing each viewport to return to the original interface shown below. Set the movement time to 5.6 seconds, the still time to 0 seconds and then click Add Image.

Add the same image to the backdrop a third time as shown below. Use the double-click method to set the starting and ending viewports to match the movement from 3 to 4. For the starting viewport, set the left distance to 800 pixels, and the top distance to 600 pixels. Set the ending viewport to be 0 pixels from the left and 600 pixels from the top.

Once again click Update after editing each viewport to return to the original interface shown below. Set the movement time to 10 seconds, the still time to 0 seconds and then click Add Image.

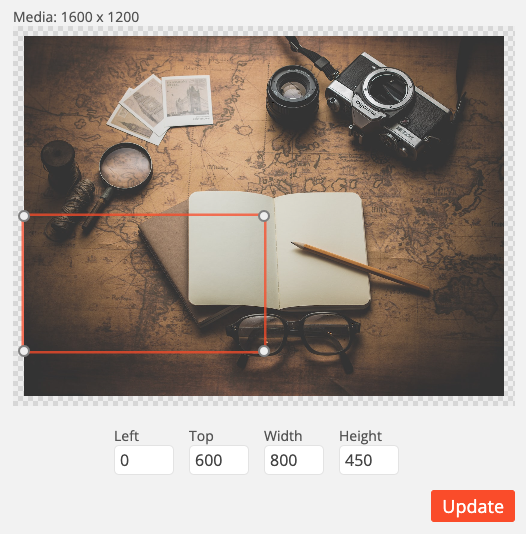
Add the same image to the backdrop for the fourth and final time as shown below. Use the double-click method to set the starting and ending viewports to match the movement from 4 to 1. For the starting viewport, set the left distance to 0 pixels, and the top distance to 600 pixels. Set the ending viewport to be 0 pixels from the left and 150 pixels from the top.


Click Update after editing each viewport to return to the original interface shown below. Set the movement time to 5.6 seconds, and the still time to 0.8 seconds. The nonzero still time for this last image is to make the resulting video exactly 32 seconds long. Lastly, click Add Image one more time.
Once the image has been added to the backdrop four times as described above, click Update Backdrop to add the image content to your project.

Preview the project in the Movidmo editor to see the full image tour created using the steps above. The completed example project is available here. The video tour published from this project is shown below.
There are a lot of interesting things that can be done with the moving image viewport in the Movidmo video editor. Consider using the above example as a starting point for trying other types of movement. Definitely use these ideas to bring the images in your Movidmo projects to life.